Ever hitched up a trailer, turned the key, and found yourself staring at a tangle of wires, wondering which one does what? You’re not alone. Trailer connectors can seem like a mystery, but understanding 6-pin trailer connectors is actually quite straightforward once you know the basics. These unsung heroes of the towing world ensure your trailer’s lights blink, brakes engage, and essential systems get power, keeping you safe and legal on the road.
Whether you're dealing with a utility trailer, a small boat trailer, or an older RV, the 6-pin connector is a common and crucial link. This guide will demystify the 6-pin setup, breaking down its functions, standard wiring, and what you need to know to connect with confidence.
At a Glance: What You’ll Learn
- What a 6-pin connector is and its primary uses.
- The function of each of the six pins and why they matter.
- Standard wiring color codes and pinout configurations.
- How 6-pin connectors compare to their 4-pin and 7-pin counterparts.
- Practical tips for installation, troubleshooting, and maintenance.
- Answers to common questions about these essential connectors.
The Unsung Hero: What Exactly is a 6-Pin Trailer Connector?
Imagine your vehicle and trailer as two parts of a team. For them to work seamlessly, they need to communicate, especially when it comes to vital functions like lighting and braking. That's where a trailer connector comes in. A 6-pin trailer connector is an electrical plug-and-socket system designed to transmit power and signals from your tow vehicle to your trailer. It's the standard solution for many smaller to mid-sized trailers that require more than just basic lighting, particularly those equipped with electric brakes.
Unlike simpler 4-pin connectors that only handle the fundamental "run, turn, and stop" lights, the 6-pin steps up the game by adding dedicated circuits for electric trailer brakes and usually a 12-volt auxiliary power feed. This makes it an incredibly versatile choice for trailers like pop-up campers, horse trailers, utility trailers carrying heavier loads, or even smaller travel trailers that need that extra functionality. Essentially, if your trailer needs independent braking power or a trickle charge for an onboard battery, the 6-pin often fits the bill perfectly.
Why Six Pins? Deciphering the Core Functions
The beauty of the 6-pin connector lies in its expanded capability. Each of those six pins serves a specific, vital role. Knowing what each pin does is the first step toward true understanding and confident connection. Let's break down the typical function for each circuit, which you can often verify with a detailed 6 pin trailer wiring diagram.
- Ground (White Wire): This is arguably the most critical circuit. Every electrical system needs a solid ground connection to complete its circuits. Without it, none of the other lights or functions will work correctly, if at all. Think of it as the return path for all electricity.
- Tail, Running, & License Plate Lights (Brown Wire): This circuit powers all the lights that illuminate when your vehicle's headlights or parking lights are on. This includes the tail lights, clearance lights along the trailer's sides, and the license plate light, ensuring your trailer is visible from all angles in low light conditions.
- Left Turn Signal & Brake Light (Yellow Wire): This single circuit handles both the left-hand turn signal and the left-hand brake light. When you signal left or apply the brakes, this wire tells the left side of your trailer to light up accordingly.
- Right Turn Signal & Brake Light (Green Wire): Mirroring the left side, this circuit controls the right-hand turn signal and the right-hand brake light. It ensures your intentions are clear to drivers behind you, whether you're turning or slowing down.
- Electric Trailer Brakes (Blue Wire): This is a key differentiator from 4-pin connectors. This wire sends a signal from your vehicle's brake controller to the electric brakes on your trailer. When activated, it applies current to the trailer's brake magnets, causing the brakes to engage. This dramatically improves stopping power and safety, especially with heavier loads.
- 12-Volt Auxiliary Power (Black Wire): Often referred to as "battery charge" or "accessory power," this pin provides a constant 12-volt power supply from your tow vehicle. It can be used to trickle-charge a small onboard trailer battery (like those in a pop-up camper for interior lights) or power small 12-volt accessories directly from the vehicle while towing. It’s not typically a heavy-duty charging circuit but is perfect for maintaining charge or powering minor loads.
Understanding this breakdown helps you troubleshoot issues and confirm that your specific 6 pin trailer wiring diagram aligns with these standard functions.
The Standard Wiring Color Code: Don't Guess, Connect Right
While the functions remain consistent, the actual colors of the wires are where things can sometimes get a little tricky, though there's a widely accepted industry standard. Always consult your vehicle and trailer manuals, or a reliable source for a 6 pin trailer wiring diagram specific to your setup. However, here's the typical color code you'll encounter for a 6-pin flat or round connector:
- White: Ground
- Brown: Tail, Running, & License Plate Lights
- Yellow: Left Turn Signal & Brake Light
- Green: Right Turn Signal & Brake Light
- Blue: Electric Trailer Brakes
- Black: 12-Volt Auxiliary Power / Battery Charge
A Critical Caveat: While these colors are the norm, it's not unheard of for older trailers or custom wiring jobs to deviate. Always, always verify the function of each wire before making a permanent connection. A simple circuit tester or multimeter is your best friend here.
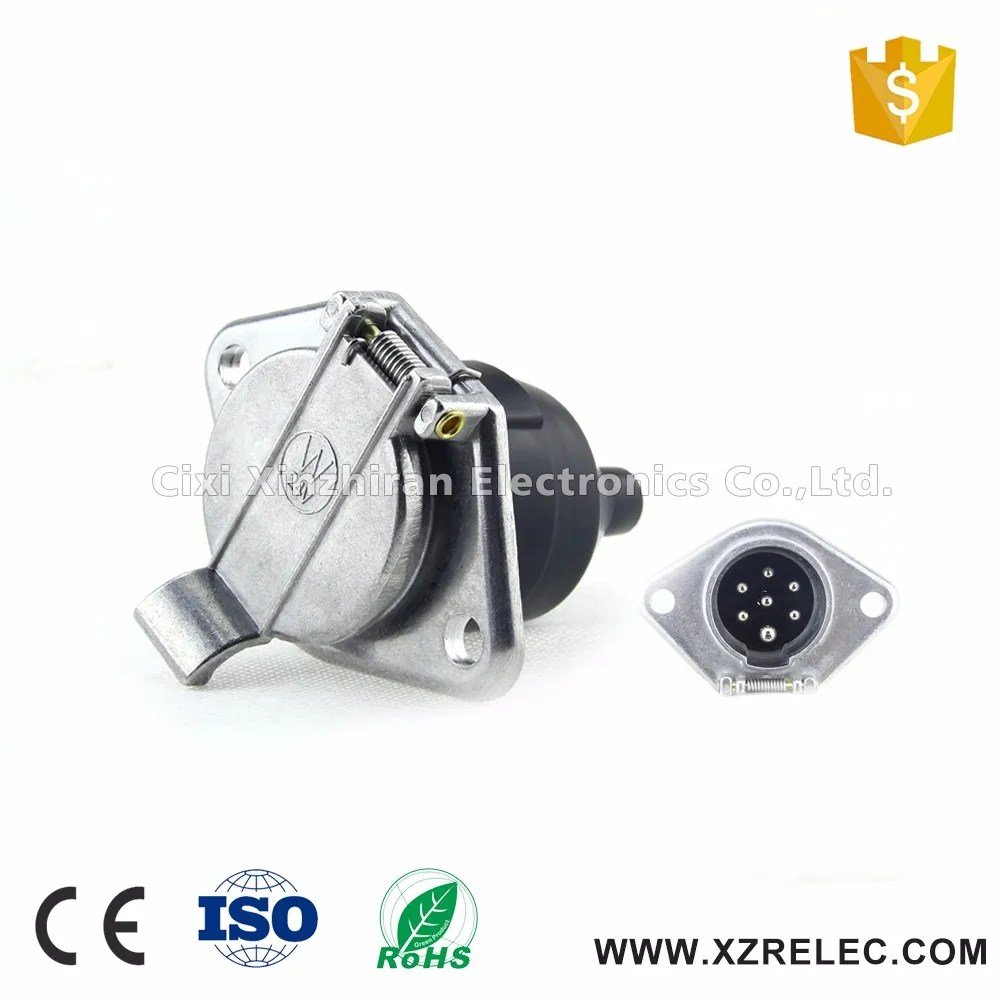
Decoding the Pinout: Trailer End vs. Vehicle End
Connecting a 6-pin means dealing with two distinct ends: the vehicle side (often a male plug with pins) and the trailer side (typically a female socket with receptacles). The configuration, or "pinout," dictates which physical pin corresponds to which electrical function.
For round 6-pin connectors, the arrangement is usually a circular pattern with one pin in the center. A common pinout for the round connector, looking at the back of the vehicle-side connector (where wires attach) or the face of the trailer-side connector (where it plugs in), might be:
- Center Pin: Electric Trailer Brakes (Blue)
- 11 o'clock position (or 1 o'clock): Right Turn/Brake (Green)
- 3 o'clock position: Tail/Running Lights (Brown)
- 5 o'clock position: 12V Auxiliary Power (Black)
- 7 o'clock position: Ground (White)
- 9 o'clock position: Left Turn/Brake (Yellow)
Important Note: The "clock positions" can sometimes vary, which is another reason why a visual 6 pin trailer wiring diagram is so invaluable. Some round connectors might have a different orientation or even a flat blade design (less common for 6-pin).
For flat 6-pin connectors, the arrangement is typically two rows of three pins. The standard follows a specific sequence, often keyed to prevent incorrect insertion.
Best Practice: When installing or troubleshooting, refer to the printed diagram often found on the connector itself or within the manufacturer's instructions. If those aren't available, cross-referencing with a verified wiring schematic is essential.
Installation and Troubleshooting: Making the Connection Stick
Getting your 6-pin connector wired correctly is a foundational step for safe towing. Whether you're installing a new connector or fixing an existing one, precision matters.
Tools You'll Need:
- Wire Strippers/Cutters: For clean cuts and insulation removal.
- Crimping Tool: To securely attach terminals (heat-shrink butt connectors or ring terminals are common).
- Heat Gun (for heat shrink connectors): Provides a watertight seal.
- Circuit Tester or Multimeter: Essential for verifying wire functions and voltage.
- Dielectric Grease: To protect connections from corrosion.
- Electrical Tape/Wire Loom: For securing and protecting wiring.
- Wire Ties/Clips: To keep wiring tidy and away from moving parts.
Step-by-Step Wiring (Simplified):
- Safety First: Disconnect your vehicle's battery. This prevents accidental shorts or shocks.
- Plan Your Run: Determine the best path for your wiring harness, avoiding sharp edges, exhaust components, and moving suspension parts.
- Prep the Wires: Strip about 1/2 inch of insulation from each wire end.
- Connect Wires: Using your crimping tool, connect the corresponding wires from your vehicle's harness to the wires of the 6-pin connector. Use appropriate connectors – heat-shrink butt connectors are highly recommended for their weather-sealing properties.
- Verify Pinout: Before sealing everything up, double-check that each wire color from the vehicle side is going to the correct pin on the connector, matching your 6 pin trailer wiring diagram.
- Secure and Protect: Once connections are solid, use wire loom and electrical tape to bundle and protect the wires. Secure the harness firmly to the vehicle frame using wire ties or clips.
- Test Thoroughly: Reconnect the battery. Plug in a known-good trailer or use a trailer light tester. Systematically check all functions:
- Tail lights: Turn on vehicle headlights/parking lights.
- Left/Right turn signals: Activate signals.
- Brake lights: Press the brake pedal.
- Electric brakes: Activate the manual override on your brake controller.
- 12V auxiliary: Use a multimeter to check for voltage at the black wire pin, or connect a small 12V accessory.
Common Problems and Quick Fixes:
- No Lights at All:
- Check Ground: The most common culprit. Ensure the white ground wire is securely connected to a clean, bare metal surface on both the vehicle and trailer. Corrosion here is a huge issue.
- Blown Fuse: Check the tow vehicle's fuse box for a blown fuse related to trailer wiring.
- Corroded Connections: Unplug and inspect the connector pins. Clean with a wire brush or electrical contact cleaner.
- Only Some Lights Work (e.g., no brake lights):
- Specific Wire Fault: Use your circuit tester to check voltage at the problematic pin. Trace the wire back to find breaks or loose connections.
- Bulb Failure: Check individual bulbs on the trailer.
- Electric Brakes Not Working:
- Brake Controller: Ensure your vehicle's brake controller is properly installed and configured. Check its fuses.
- Blue Wire Continuity: Verify the blue wire for breaks or loose connections from the controller to the trailer.
- Trailer Brake Magnets: Inspect the trailer's brake assemblies for magnet wear or damage.
- Intermittent Issues: Often caused by loose connections, partial breaks in wires (especially where they flex), or corrosion within the connector itself. Wiggle the connector and wiring while checking for lights to diagnose.
When to Use a 6-Pin Connector (and When Not To)
Choosing the right trailer connector is crucial for both functionality and safety. The 6-pin connector hits a sweet spot for many towing applications, but it's not a one-size-fits-all solution.
Ideal For:
- Trailers with Electric Brakes: This is the primary reason to step up from a 4-pin. Utility trailers, boat trailers, and smaller RVs with a GVWR (Gross Vehicle Weight Rating) that mandates electric brakes will typically use a 6-pin.
- Small to Medium-Sized RVs (e.g., pop-up campers): These often benefit from the 12V auxiliary power to keep a small battery topped off for interior lights or small appliances.
- Utility Trailers with Heavy Loads: While a utility trailer might sometimes use a 4-pin, if you're consistently hauling heavy equipment that would benefit from electric brakes, a 6-pin is the way to go.
Limitations (and When to Consider Other Options):
- No Reverse Lights: Unlike a 7-pin, the 6-pin doesn't have a dedicated circuit for reverse lights. This means your trailer's reverse lights (if it has them) won't illuminate when you shift into reverse. This might be a minor inconvenience for some, but a safety concern for others.
- Limited Auxiliary Power: While it provides 12V auxiliary power, it's typically a lighter gauge wire compared to a 7-pin. This means it's suitable for trickle charging or powering small accessories, but not for heavy-duty charging of large RV batteries or running multiple high-draw appliances.
- Not for Very Heavy Duty or Modern RVs: Large travel trailers, fifth wheels, or horse trailers with living quarters typically require a 7-pin connector. These often need a heavier gauge 12V auxiliary wire for more robust charging, a dedicated reverse light circuit (for backup cameras or clear visibility), and sometimes other auxiliary functions.
Comparison to 4-Pin and 7-Pin Connectors:
- 4-Pin (Flat): The simplest and most common. Handles left turn/brake, right turn/brake, tail lights, and ground. Perfect for small utility trailers, boat trailers, and jet ski trailers without electric brakes or auxiliary power needs. It's the "just the basics" option.
- 6-Pin (Round or Flat): As discussed, adds electric brake control and 12V auxiliary power. It's the step up when basic lights aren't enough, but you don't need all the features of a 7-pin.
- 7-Pin (Blade-Style): The most comprehensive standard connector. It includes all the functions of a 6-pin, plus a dedicated reverse light circuit and often a heavier gauge 12V auxiliary wire for stronger charging. This is the gold standard for most modern travel trailers, large RVs, and horse trailers with living quarters, offering maximum functionality and safety.
Choosing between them often boils down to two key questions: "Does my trailer have electric brakes?" and "Does my trailer need robust 12V power or reverse lights?" If the answer to the first is yes, and the answer to the second is no (or minimal 12V), then a 6-pin is likely your match.
Maintenance Tips for Long-Lasting Connections
A properly functioning 6-pin connector isn't just about initial wiring; it's about consistent performance over time. A little proactive maintenance goes a long way in preventing frustrating electrical issues down the road.
- Regular Inspection: Before each tow, take a moment to visually inspect both the vehicle and trailer connector ends. Look for bent pins, corrosion, cracked housings, or frayed wires.
- Keep it Clean: Dust, dirt, and road grime can accumulate in the connectors, interfering with electrical flow. Use an electrical contact cleaner and a small brush (like an old toothbrush) to clean the pins and receptacles.
- Apply Dielectric Grease: This non-conductive, silicone-based grease is your best friend. Apply a thin layer to the connector pins and inside the receptacle. It helps prevent corrosion, especially in wet or humid environments, and makes connecting/disconnecting easier.
- Proper Storage: When not in use, keep the connectors covered. Many vehicle-side connectors come with a cap, and trailer connectors can be tucked away or have a dedicated storage bracket to protect them from the elements and physical damage.
- Secure Wiring: Ensure all wiring is securely fastened to the trailer and vehicle frame. Loose wires can get snagged, frayed, or rub through insulation, leading to shorts or breaks. Check for signs of wear where wires might chafe.
By following these simple tips, you can significantly extend the life of your 6-pin connector and reduce the likelihood of unexpected electrical failures while towing.
Safety First: Essential Practices for Trailer Wiring
Towing always comes with inherent risks, and faulty wiring can compound those significantly. Prioritizing safety in all your trailer wiring endeavors isn't just good practice—it's essential for protecting yourself, your passengers, your cargo, and others on the road.
- Always Disconnect the Battery: Before performing any wiring work on your tow vehicle, disconnect the negative terminal of the battery. This prevents accidental short circuits, electrical shocks, and potential damage to your vehicle's sensitive electronics.
- Use the Correct Wire Gauge: Electrical circuits require wires of appropriate thickness (gauge) to handle the current. Using wires that are too thin can lead to overheating, voltage drop (dim lights), and even fire. Refer to your vehicle's specifications or a reliable 6 pin trailer wiring diagram for the recommended wire gauges for each circuit.
- Employ Proper Connectors and Seals: Don't twist and tape wires. Use high-quality crimp connectors, ideally marine-grade heat-shrink butt connectors, which provide a sealed, weatherproof connection. This prevents moisture ingress and corrosion, which are primary causes of wiring failures.
- Thoroughly Test All Functions: After any wiring work, always conduct a comprehensive test of all lights and brake functions. Walk around the trailer while a helper operates the vehicle's lights and brakes. Check turn signals, tail lights, brake lights, and confirm the electric brakes engage. Don't assume everything is working correctly.
- Secure All Wiring: Loose wiring is a hazard. Ensure all wiring runs are properly routed, supported, and secured with wire ties or clips every 12-18 inches. Keep wires away from exhaust components, moving parts (like suspension or tires), and sharp edges that could chafe the insulation.
- Adequate Ground Connection: Re-emphasizing this critical point: A poor ground connection is the number one cause of trailer lighting problems. Ensure the ground wire (white) is securely connected to a clean, rust-free, bare metal chassis point on both the vehicle and the trailer. Sand away any paint or rust before attaching the ground wire.
By adhering to these safety practices, you build a foundation of reliability and peace of mind every time you hitch up.
Frequently Asked Questions About 6-Pin Connectors
Let's tackle some common queries that often arise when dealing with 6-pin trailer connectors.
Can I convert a 6-pin vehicle connector to a 7-pin trailer connector?
Yes, you can. You'll need an adapter, or you can re-wire the vehicle side to a 7-pin connector. If re-wiring, you'll gain the reverse light function (if your vehicle supports it) and potentially a heavier gauge 12V auxiliary line, but ensure your vehicle's existing wiring can support the additional circuits and current draw.
What if my trailer has a 4-pin connector and my vehicle has a 6-pin?
This is a common scenario. You can use a 6-pin to 4-pin adapter. These adapters are widely available and simply convert the signals, leaving the electric brake and 12V auxiliary pins on your vehicle's connector unused.
Is there a difference between an RV 6-pin and a utility trailer 6-pin?
Electrically, the pin functions are generally the same following the standard discussed (ground, tail, turn/brake, electric brakes, 12V aux). However, the physical connector housing might vary slightly in shape or material quality between "RV style" round connectors and some "flat" utility trailer connectors. Always match the style (round to round, flat to flat) and ensure the wiring corresponds to a standard 6 pin trailer wiring diagram.
Why are my trailer lights dim or flickering?
This almost always points to a poor ground connection. Electrical current needs a complete circuit, and a weak ground means the lights aren't getting enough power. Other causes include corroded connections (increasing resistance), undersized wiring, or low voltage from the tow vehicle. Start by cleaning all ground points and connector pins.
Do all 6-pin connectors have electric brake control?
Yes, the inclusion of the electric brake control circuit (blue wire) is one of the defining features and primary reasons for using a 6-pin connector over a 4-pin. If your trailer has electric brakes, you'll need this dedicated circuit.
Can I use the 12V auxiliary power to charge my main vehicle battery?
No, the 12V auxiliary circuit (black wire) on a standard 6-pin connector is designed to provide power from the tow vehicle to the trailer, not the other way around. It's usually for maintaining a trailer battery or powering small accessories on the trailer. Attempting to charge your vehicle's battery through this circuit could damage your vehicle's electrical system.
Mastering Your Trailer Connection: The Road Ahead
Navigating the world of trailer connectors doesn't have to be intimidating. With a solid grasp of what a 6-pin trailer connector does, how its pins are wired, and a commitment to safe, thorough installation and maintenance, you're well on your way to smooth and secure towing experiences. Remember, the goal is not just to get your lights working, but to ensure that your trailer is a seamless and safe extension of your tow vehicle.
By understanding the vital role each pin plays and proactively addressing potential issues, you gain confidence and control, making every journey a little bit easier. Always keep a reliable 6 pin trailer wiring diagram handy, and you'll be ready for whatever the road throws your way. Happy towing!