It’s a deceptively simple connection, that bundle of wires linking your trusty tow vehicle to your trailer, yet the humble 6-pin trailer wiring setup is the unsung hero of countless journeys. From weekend boat launches to cross-country RV adventures, ensuring its proper function through diligent Maintenance & Safety Tips for 6-Pin Trailer Wiring isn't just about avoiding a roadside headache – it's about road safety for everyone. A malfunctioning turn signal, a failed brake light, or worse, compromised electric brakes, can turn a pleasant trip into a hazardous one.
Think of your trailer wiring as the nervous system of your towing operation. Just like you wouldn't ignore a persistent cough, you shouldn't overlook the vital health of these connections. With a bit of proactive care and understanding, you can keep your lights bright, your brakes responsive, and your adventures smooth and safe.
At a Glance: Your Quick Guide to 6-Pin Wiring Well-being
- Inspect Regularly: Before every trip, give your connections a visual check for damage, corrosion, and loose wires.
- Cleanliness is Key: Keep pins and receptacles free of dirt, debris, and corrosion with specialized cleaners and brushes.
- Grease for Goodness: Apply dielectric grease to connections to protect against moisture and enhance conductivity.
- Test, Test, Test: Always verify all lights (running, brake, turn) and electric brakes are working correctly before hitting the road.
- Mind Your Ground: Most wiring issues trace back to a poor ground connection. Ensure yours is solid.
- Route Smart: Secure wiring away from hot components, sharp edges, and moving parts to prevent wear and tear.
- Don't Overlook Fuses: Know where your vehicle and trailer fuses are for quick troubleshooting.
The Unseen Workhorse: Why Your 6-Pin Connection Deserves Undivided Attention
When you first started towing, the sheer convenience of a functioning 6-pin connection likely became immediately apparent. This setup seamlessly bridges your vehicle's electrical system with your trailer's, handling essential functions that are crucial for both legality and safety. Unlike simpler 4-pin systems, the 6-pin connector offers an extra pair of wires, typically dedicated to crucial features like electric trailer brakes and sometimes a reverse light or auxiliary power, making it incredibly versatile for heavier loads and more complex trailers.
This robust design not only provides peace of mind on the road but also keeps other drivers safe by clearly signaling your intentions. The additional pins, particularly for electric brakes, give you far greater control over a heavy load, which can be a game-changer on steep inclines or during sudden stops. Investing time in its upkeep means less time troubleshooting issues by the side of the road and more time enjoying the journey.
Deconstructing the Connection: A Brief Look at 6-Pin Wiring Basics
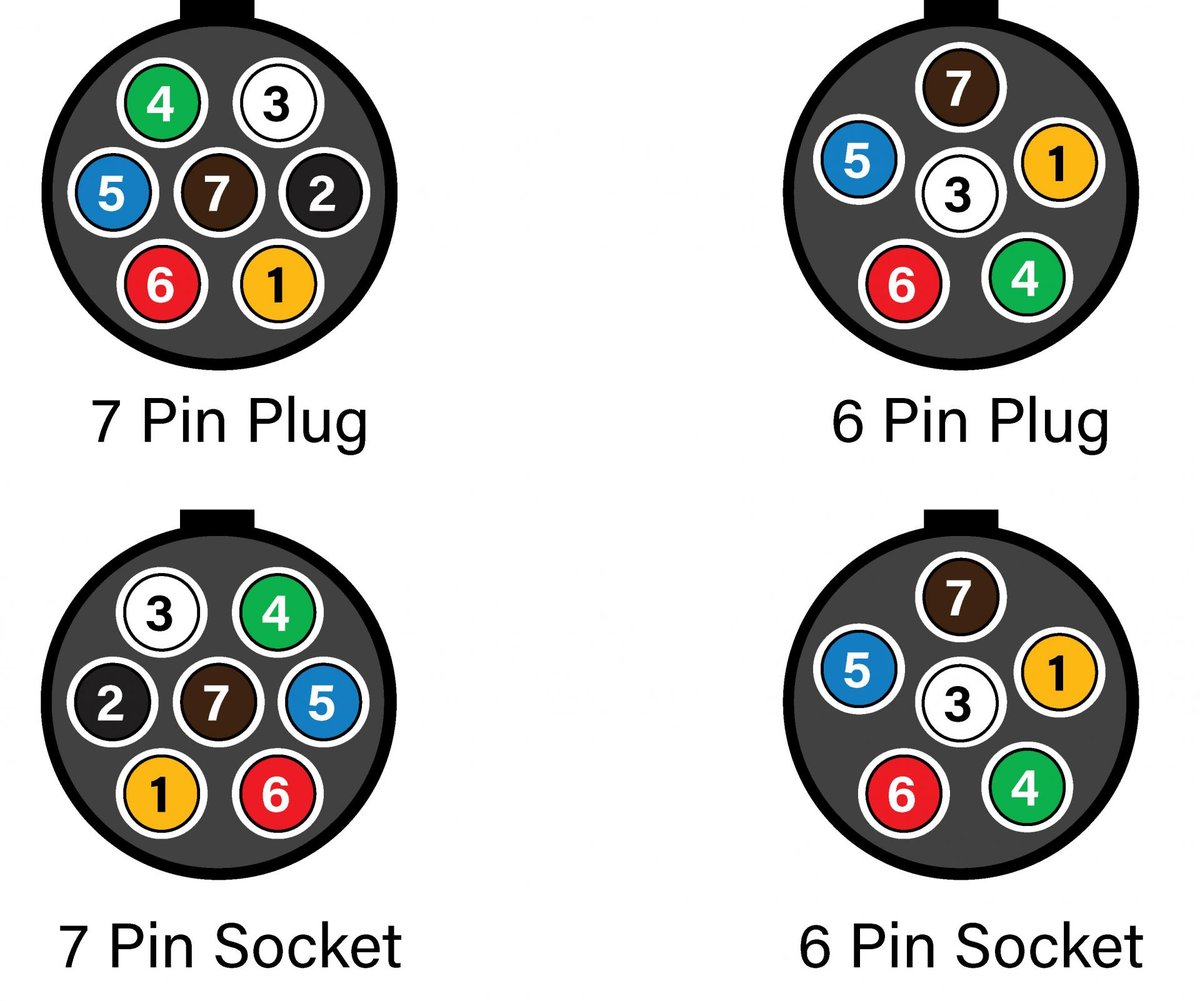
Before you can maintain or troubleshoot your 6-pin system, it helps to understand what each wire does. While standard color codes exist, it's always wise to consult your specific vehicle and trailer manuals, as variations can occur. Generally, you'll find:
- White: Ground (the essential return path for all circuits).
- Blue: Electric Brakes (activates the trailer's electric braking system).
- Green: Right Turn Signal & Brake Light (for the right side of the trailer).
- Yellow: Left Turn Signal & Brake Light (for the left side of the trailer).
- Brown: Taillights & Running Lights (powers all marker lights, license plate lights, and taillights).
- Red or Black: 12-Volt Auxiliary Power (often used for charging the trailer battery, powering accessories, or providing backup light functionality).
Understanding these assignments is your first step toward effective maintenance and troubleshooting. For a more detailed visual, you can consult a Complete 6-pin wiring schematic. Knowing which color does what will empower you to quickly identify potential issues and ensure every component is functioning as intended.
The Cornerstone of Safety: Your Pre-Trip Inspection Ritual
Every journey, no matter how short, should begin with a thorough pre-trip inspection of your 6-pin trailer wiring. This isn't just a suggestion; it's a non-negotiable safety protocol. Think of it as your flight attendant's pre-flight check – essential for a smooth departure and arrival.
The Visual Rundown: What to Look For
Before you even turn the key, give the entire wiring assembly a close look:
- Connector Condition: Examine both the vehicle's receptacle and the trailer's plug. Are there any bent, corroded, or missing pins? Is the plastic housing cracked, chipped, or otherwise damaged? Even minor damage can compromise the connection and allow moisture in.
- Cable Integrity: Follow the entire length of the trailer's wiring harness. Look for signs of chafing, cuts, or cracks in the insulation. Wires that are exposed to the elements or rubbing against the trailer frame are prime candidates for failure. Pay close attention to points where the wiring passes through grommets or bends sharply.
- Secure Mounting: Ensure the wiring harness is securely fastened to the trailer frame. Loose wiring can snag on road debris, drag on the ground, or get pinched, leading to costly damage and potential signal loss.
- Spring-Loaded Lids (if applicable): If your vehicle's receptacle has a spring-loaded lid, ensure it closes tightly to keep out dirt and moisture when not in use.
The Functional Check: Lights, Brakes, Action!
Once the visual inspection is complete, it's time to test the electrical functions:
- Connect the Trailer: Securely plug the trailer harness into your vehicle's receptacle.
- Running Lights: Turn on your vehicle's headlights. Walk around the trailer to confirm all running lights, marker lights, and license plate lights are illuminated.
- Brake Lights: Have a helper press the brake pedal (or wedge a stick against it). Check that both brake lights on the trailer illuminate brightly.
- Turn Signals: Test the left and right turn signals, ensuring they flash in sync with your vehicle's signals.
- Electric Brakes: If your trailer has electric brakes, engage the manual override on your brake controller (if equipped). You should hear the trailer brakes hum faintly, and you should feel resistance when trying to pull the trailer slightly forward. If you don't have a manual override, a slow test drive after connecting is essential to confirm brake engagement. You can also use a trailer wiring tester that specifically checks electric brake output.
- Auxiliary Power/Reverse Lights (if applicable): If your 6-pin provides auxiliary power for a trailer battery charger, verify its function. If you have reverse lights, test those as well.
Performing this thorough check before every tow ensures that you’re not only compliant with regulations but, more importantly, are maximizing safety for yourself and everyone else on the road.
Deep Dive into Maintenance: Keeping Your Connection Pristine
Regular, proactive maintenance is the bedrock of a reliable 6-pin trailer wiring system. This goes beyond simple inspections and involves hands-on care to combat the elements and wear and tear.
Cleaning Contacts: The Spark of Good Connection
Corrosion and dirt are the archenemies of electrical connections. Over time, moisture, road salt, and grime can build up on the pins and inside the receptacle, leading to intermittent signals or complete failure.
- What to use: A specialized electrical contact cleaner (like one designed for automotive use) and a small wire brush or even a stiff toothbrush are your best tools. For tougher corrosion, a very fine-grit sandpaper or emery board can be used gently on the pins, but be cautious not to remove too much material.
- How to do it:
- Disconnect Power: Always ensure the trailer is disconnected from the tow vehicle before cleaning.
- Spray and Scrub: Apply contact cleaner generously to both the male pins on the trailer plug and the female terminals inside the vehicle's receptacle. Use your brush to scrub away any visible corrosion or grime.
- Rinse and Dry: Allow the cleaner to evaporate fully or wipe away excess with a clean, lint-free cloth. Ensure all moisture is gone before reconnecting.
Securing Connections: Preventing the Jiggle Jinx
Vibration from towing can cause wires to loosen over time, leading to poor connections and signal dropouts.
- Check Fasteners: Periodically inspect all screws, bolts, and clamps securing the wiring harness to the trailer frame. Tighten any that are loose, but don't overtighten, which could damage insulation.
- Strain Relief: Ensure the wiring has proper strain relief where it enters the connector housings. This prevents individual wires from pulling out due to tugging or vibration.
- Zip Ties & Clips: Use automotive-grade zip ties or specialized clips to neatly bundle and secure the wiring, keeping it away from potential pinch points, moving parts, or areas where it could drag.
Inspecting and Repairing Wiring: Fraying and Fractures
The wiring itself can suffer damage from age, weather, or physical impact.
- Frayed Wires/Cracked Insulation: Carefully inspect the insulation along the entire harness. If you find any frayed wires or cracked insulation, immediate repair is necessary.
- Proper Splicing: For minor damage to individual wires, a proper splice involves stripping back the insulation, twisting the wires together, soldering the connection for maximum reliability, and then sealing it with marine-grade heat shrink tubing that has an adhesive lining. Never just twist and tape; standard electrical tape isn't sufficient for long-term outdoor exposure.
- Full Harness Replacement: For extensive damage, particularly near the connector, or if multiple wires are compromised, replacing the entire wiring harness might be the safest and most cost-effective solution in the long run.
Protecting from the Elements: Weatherproofing Your Investment
Trailer wiring lives a tough life, constantly exposed to sun, rain, road grime, and salt.
- Dielectric Grease: After cleaning and before reconnecting, apply a generous amount of dielectric grease to the pins and inside the receptacle. This non-conductive, silicone-based grease helps seal out moisture, prevents corrosion, and lubricates the connection, making it easier to plug and unplug.
- Connector Covers: When not in use, always put a protective cap or cover over the trailer's plug. This keeps dirt, moisture, and debris out of the pins. Many vehicle receptacles also come with spring-loaded covers; ensure yours is functional.
- Proper Storage: If you store your trailer outdoors, ensure the wiring harness is coiled neatly and secured to prevent it from dragging or sitting in puddles.
Connector Integrity: A Snug Fit
The male and female connectors should mate snugly. A loose connection is a breeding ground for problems.
- Pin Tension: Over time, the female terminals inside the vehicle's receptacle can lose their tension, leading to a loose fit. While difficult to repair, some specialty tools can be used to carefully gently re-tension them. If tension is consistently poor, the receptacle may need replacement.
- Bent Pins: Carefully use needle-nose pliers to straighten any bent pins on the trailer plug. Be gentle, as metal fatigue can lead to breakage.
- Corrosion in Receptacle: Use a small pick or non-metallic tool to gently scrape out any hard-packed corrosion or debris from deep inside the female terminals of the receptacle.
Troubleshooting Common 6-Pin Issues: Solving the Mystery
Even with diligent maintenance, issues can arise. Knowing how to systematically troubleshoot can save you time and frustration. Many problems are simpler to fix than they appear.
1. No Lights / Intermittent Lights
This is perhaps the most common complaint and often has several culprits:
- Poor Ground Connection: The number one cause of all trailer light issues. The white wire provides the ground return path for all circuits.
- Check: Ensure the white ground wire is securely fastened to a clean, unpainted metal part of the trailer frame. Remove any rust or paint under the connection point. Check the ground wire connection within the vehicle's towing harness as well.
- Corroded/Loose Connections: Revisit cleaning and dielectric grease steps. A loose plug-to-receptacle connection can cause intermittent flickering.
- Blown Fuses:
- Vehicle: Check the fuse box in your tow vehicle (often under the hood or dash) for fuses labeled "trailer lights," "towing," or specific light functions.
- Trailer: Some trailers have their own in-line fuses, particularly for the 12V auxiliary power or electric brakes. Check these if you have them.
- Bad Bulbs: Don't overlook the obvious! If only one light is out, try replacing the bulb (if it's not an LED system).
- Damaged Wiring: Look for cuts, pinches, or breaks along the harness.
2. Electric Brake Controller Issues
If your trailer brakes aren't working or are acting erratically:
- Blue Wire Integrity: The blue wire directly controls the electric brakes. Check it for damage or breaks from the connector all the way to the brake assemblies on the trailer.
- Brake Controller Connection: Ensure the brake controller itself is properly wired to your vehicle and securely mounted. Check its fuses.
- Trailer Brake Magnet Resistance: Faulty brake magnets on the trailer axles can be an issue. This usually requires a multimeter and some mechanical knowledge, or a professional.
- Adjustments: Ensure your brake controller is properly calibrated for your trailer's weight and brake type.
3. Grounding Problems: The Silent Killer
As mentioned, a bad ground is a pervasive issue. A solid ground connection is crucial for all trailer electrical functions. If lights are dim, flickering, or not working at all despite bulbs and fuses being good, suspect the ground.
- Tow Vehicle Side: Ensure the ground wire from your vehicle's harness is firmly connected to a clean, unpainted section of the vehicle's frame.
- Trailer Side: The white ground wire from the trailer harness should be similarly connected to the trailer frame. You might even add a secondary ground wire from the trailer frame to one of the trailer's axles for extra redundancy, especially for electric brakes.
4. Using a Multimeter for Diagnosis
For more complex issues, a multimeter is an invaluable tool.
- Checking Voltage: With the trailer unplugged, use your multimeter to check the voltage output at each pin of your vehicle's receptacle when the corresponding function is activated (e.g., 12V at the brown pin with lights on, 12V at the yellow/green pins with turn signals, 12V at the blue pin when the brake controller is engaged). This tells you if the vehicle is sending power.
- Checking Continuity: On the trailer side (unplugged), you can use the continuity setting to check for breaks in individual wires or to verify the integrity of ground connections from the plug to various parts of the trailer.
Essential Safety Protocols for Confident Towing
Beyond basic maintenance, adhering to specific safety protocols ensures your 6-pin wiring system contributes to overall towing safety, not detracts from it.
- Always Test Before Every Trip: This cannot be overstressed. Even if it worked perfectly last time, conditions change.
- Avoid Overloading Circuits: Be mindful of what you're powering with the 12V auxiliary wire. Running too many accessories (e.g., charging a large RV battery while simultaneously running high-draw interior lights) can blow fuses or damage wiring.
- Proper Routing of Wires: When installing or inspecting, ensure wires are routed away from:
- Hot Components: Exhaust pipes, engine parts, etc.
- Moving Parts: Suspension components, axles, tires.
- Sharp Edges: Frame members, metal panels where insulation could be cut.
- Use loom or conduit for added protection in vulnerable areas.
- Emergency Breakaway Systems: For trailers equipped with electric brakes and an emergency breakaway system, ensure the breakaway switch and its wiring are in perfect working order. This system is designed to apply the trailer brakes if the trailer detaches from the tow vehicle, preventing a runaway. Test it according to the manufacturer's instructions.
- Understand Electric Brake Functionality: If your 6-pin system includes electric brakes, take the time to learn how your brake controller works. Understand its settings, how to adjust it for different loads, and how to use the manual override effectively. A properly adjusted brake controller makes a huge difference in stopping power and stability.
Beyond the Basics: Enhancements and Best Practices
Once you’ve mastered the fundamentals of 6-pin wiring maintenance and safety, you might consider some enhancements or professional services to further optimize your towing experience.
- Consider LED Trailer Lights: Upgrading to LED trailer lights can reduce electrical draw on your system and offer much brighter, longer-lasting illumination. While a higher initial cost, they often pay for themselves in reduced maintenance and improved visibility.
- Upgrade to Heavier Gauge Wire: If you frequently tow long distances, in harsh conditions, or notice voltage drop issues with your current setup, consider upgrading critical runs (especially for electric brakes or auxiliary power) to a heavier gauge wire. Thicker wire reduces resistance, ensuring more consistent power delivery.
- Use High-Quality Connectors: Not all connectors are created equal. Investing in marine-grade or heavy-duty connectors with robust weatherproofing and durable pin construction can significantly extend the life of your wiring system.
- Professional Inspection Schedule: Even the most diligent DIYer can benefit from a professional inspection every few years, especially if you tow frequently or have an older trailer. A trained technician can spot subtle issues, perform in-depth diagnostics, and address potential problems before they become critical failures.
- Carry Spare Fuses: Keep a small assortment of appropriate spare fuses for both your vehicle and trailer in your glove box or toolbox. A blown fuse is a quick fix if you have a replacement.
Your Questions Answered: 6-Pin Wiring FAQs
Q: Can I convert a 6-pin trailer wiring system to a 4-pin or 7-pin?
A: Yes, adapters are readily available to convert a 6-pin vehicle receptacle to a 4-pin trailer plug, and vice versa. Similarly, adapters exist to go between 6-pin and 7-pin systems. When converting, ensure you understand which functions are lost or gained. For instance, converting 6-pin to 4-pin means losing the electric brake and auxiliary power connections.
Q: What's the most common problem with 6-pin trailer wiring?
A: Without a doubt, the most common issue is a poor or corroded ground connection (the white wire). This often manifests as flickering lights, dim lights, or multiple lights failing simultaneously. Corrosion within the connector pins and receptacle is a close second.
Q: How often should I replace my trailer wiring?
A: There's no fixed schedule. Replace your wiring when it shows significant signs of wear and tear, such as widespread cracking in the insulation, numerous frayed wires, or recurring electrical problems that can't be resolved with simple cleaning or repair. Proactive replacement can be a good idea for very old trailers, especially if the wiring has been exposed to harsh elements for years.
Q: What kind of dielectric grease should I use?
A: Use a high-quality, silicone-based dielectric grease specifically designed for automotive electrical connections. It should be non-conductive, waterproof, and temperature-stable. Avoid petroleum-based greases, which can damage plastic or rubber components.
Q: My trailer lights work, but my electric brakes don't. What could be wrong?
A: This usually points to an issue with the blue electric brake wire specifically. Check the blue wire for continuity, inspect the brake controller's wiring and fuses, and ensure the manual override on your controller is functioning. It could also be an issue with the brake magnets themselves or a break in the wiring closer to the trailer's axles.
Final Check: Confident Towing Starts Here
Towing a trailer should be an enjoyable experience, not a source of anxiety. By investing a little time in understanding, maintaining, and inspecting your 6-pin trailer wiring, you're not just preventing potential headaches; you're actively ensuring the safety of your cargo, your vehicle, and everyone else on the road. Make these maintenance and safety tips a regular part of your towing routine, and you'll be well-prepared for whatever adventure lies ahead. Your journey deserves a reliable connection, every single time.