If you've ever stood scratching your head at a tangle of wires, wondering how to get your trailer lights to sync perfectly with your tow vehicle, you're not alone. The prospect of tackling an electrical project like a DIY Installation Guide: Wiring a 6-Pin Trailer Connector can seem daunting. But with the right knowledge, tools, and a clear, step-by-step guide, you can confidently wire your trailer and hit the road safely. This isn't just about connecting wires; it's about empowering you to understand the system, ensure safety, and gain the satisfaction of a job well done.
A 6-pin trailer connector is a robust solution for trailers that need more than just basic lights, such as goosenecks, horse trailers, or larger utility trailers. It provides essential functions like running lights, turn signals, brake lights, ground, and crucially, an electric brake controller output and a 12V hot lead for auxiliary power. Getting these connections right is vital for safety, compliance, and convenience.
At a Glance: Your Roadmap to a Wired Trailer
Before we dive into the nitty-gritty, here's what you'll master by the end of this guide:
- Understand the "Why": Why a 6-pin connector is essential for specific trailer types.
- Safety First: Prioritize electrical safety with proper preparation and tools.
- Decipher the Code: Learn the standard color code for 6-pin wiring, with critical caveats.
- Gauge Right: Know the correct wire gauges for optimal performance and safety.
- Trailer Side Up: Step-by-step instructions for wiring your trailer's connector, with or without a junction box.
- Vehicle Side Ready: How to connect your tow vehicle, whether it has an existing 4-way, 6-way, or no connector at all.
- Connect with Confidence: Master various connection methods, from soldering to butt connectors.
- Test and Trust: Essential post-installation testing to ensure everything works flawlessly.
- Troubleshoot Like a Pro: Address common issues and keep your trailer connected for the long haul.
Beyond the 4-Way: Why Choose a 6-Pin?
You might be familiar with the common 4-way flat connector, which handles basic tail lights, turn signals, and ground. But for trailers equipped with electric brakes or auxiliary power needs, the 6-pin round connector steps up to the plate. Think of it as adding two extra lanes to your electrical highway.
Those two extra connections are game-changers:
- Electric Brake Controller Output: This is paramount for safely towing trailers with electric brakes. Your vehicle's brake controller sends a signal through this wire, activating the trailer brakes in sync with your tow vehicle, ensuring smooth, controlled stops. Without it, your trailer's brakes won't work, which is a serious safety hazard.
- 12V Hot Lead: This constant power source is incredibly useful. It can keep a breakaway battery charged (a legal requirement for many trailers with electric brakes), power interior lights, or run a small refrigerator while the trailer is connected to the vehicle.
Understanding these additional functions clarifies why a 6-pin system is a more robust and necessary choice for many heavy-duty or feature-rich trailers.
Safety First: Your Essential Pre-Wire Checklist
Working with electricity, even low-voltage trailer wiring, demands respect. A quick oversight can lead to frustrating shorts, damaged components, or even personal injury. Before you even think about stripping a wire, let's establish a safety-first mindset.
- Disconnect Power: Always, always, always disconnect your vehicle's battery by removing the negative terminal. This prevents accidental shorts and protects you from electrical shocks while working.
- Wear Protection: Safety glasses are non-negotiable. Sparks, flying bits of wire, or even chemicals can cause eye damage. Gloves can protect your hands from cuts and scrapes.
- Work in a Well-Ventilated Area: If you're soldering or using heat shrink, ensure good airflow to disperse fumes.
- Inspect Your Tools: Ensure your wire strippers, crimpers, and cutters are in good condition. Dull tools can make connections unreliable.
- Read the Instructions: Every wiring harness or trailer component comes with specific instructions. Do not skip these. They often contain crucial details about color codes or unique installation steps for that particular product. Our guide provides general standards, but manufacturers can vary.
- Have a Fire Extinguisher Nearby: While unlikely, electrical fires can happen. A small ABC-rated extinguisher offers peace of mind.
Taking these precautions isn't overkill; it's smart practice that ensures your project is successful and safe.
Tools of the Trade: What You'll Need for a Flawless Install
Having the right tools makes all the difference between a frustrating ordeal and a satisfying DIY project. Gather these essentials before you begin:
- Wire Strippers/Cutters: A good quality, multi-purpose tool that can cleanly strip various wire gauges without damaging the conductors.
- Wire Crimpers: For secure connections with butt connectors and ring terminals. Many wire strippers include crimpers.
- Heat Gun: Essential for heat-shrink butt connectors and heat-shrink tubing, providing weather-tight seals.
- Digital Multimeter or Circuit Tester (Test Light): Absolutely critical for verifying wire functions on both the vehicle and trailer. Don't guess; test!
- Electrical Tape: For minor insulation and bundling wires.
- Zip Ties or Wire Clips: To secure wires and prevent chafing.
- Butt Connectors (Heat-Shrink Preferred): For splicing wires. Choose appropriate gauges.
- Ring Terminals (Various Sizes): If you're using a junction box.
- Dielectric Grease: To prevent corrosion on electrical connections.
- Screwdrivers/Wrenches: For junction boxes, mounting brackets, and battery terminals.
- Drill and Bits: For mounting brackets or junction boxes if installing new.
- Utility Knife: For carefully cutting open loom or wire bundles.
- Safety Glasses and Gloves: As discussed, for your protection.
- Wire Loom/Conduit: For protecting exposed wiring from elements and abrasion.
- Extra Wire: Especially 12-gauge and 16-gauge, to extend runs if needed.
- Battery Terminal Connectors (Optional): If running a new hot lead directly to your vehicle's battery.
- Soldering Iron and Solder (Optional, for superior connections): If you prefer to solder.
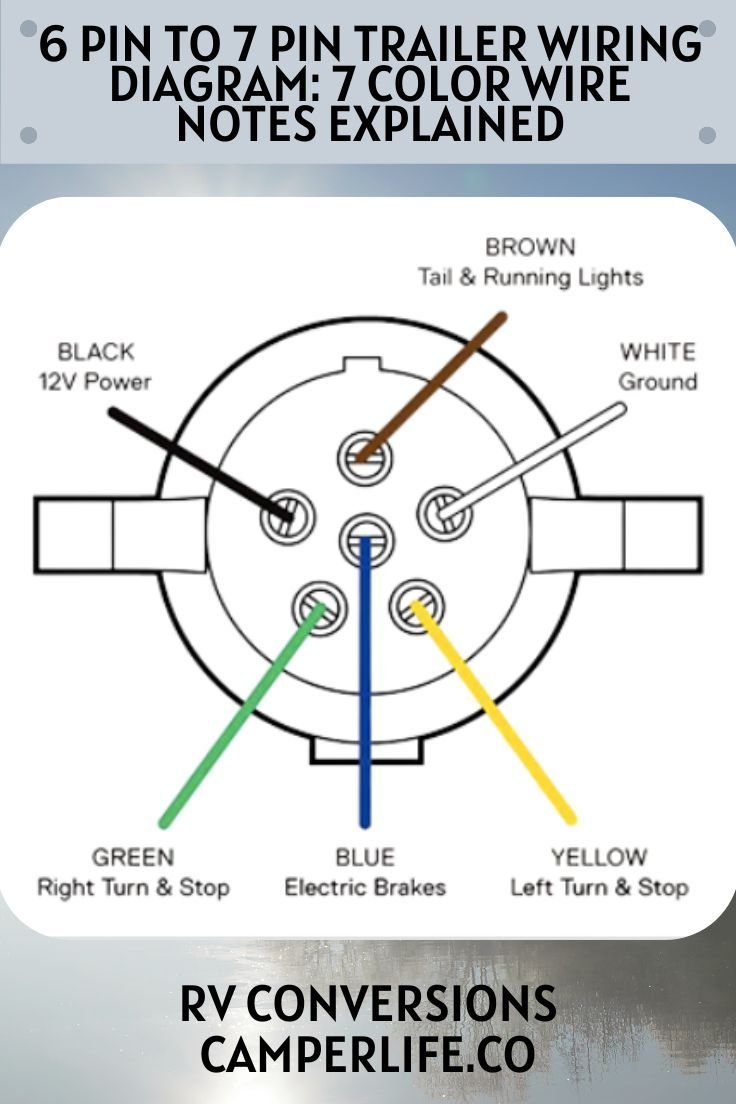
Decoding the Wires: The 6-Pin Standard Color Code
Understanding the standard color code is your first step to making sense of the wiring. However, and this is a point we cannot stress enough, always consult the manufacturer's instructions or use a circuit tester to verify wire functions before making any permanent connections. While there's a widely accepted standard, variations exist, and a simple check can save you hours of troubleshooting later.
Here's the common 6-way trailer plug wiring scheme:
| Wire Color | Function | Typical Gauge |
|---|---|---|
| White | Ground Wire | Minimum 12 gauge |
| Brown | Tail/Running Lights | Minimum 16 gauge |
| Yellow | Left Turn/Brake Light | Minimum 16 gauge |
| Green | Right Turn/Brake Light | Minimum 16 gauge |
| Blue | Brake Controller Output | Minimum 12 gauge |
| Red/Black | Battery Hot Lead (12V+) | Minimum 12 gauge |
| Important Considerations: |
- Wire Gauge Matters: The gauge number is inverse to wire thickness; a smaller number means a thicker wire. Thicker wires can handle more current without overheating. Using wires that are too thin (high gauge number) for high-current applications (like the 12V hot lead or brake control) can lead to voltage drop, overheating, and potential fire hazards. Always err on the side of slightly thicker wire if in doubt.
- Blue vs. Red/Black Swap: As noted in the ground truth, the blue (brake control) and red/black (12V hot) wires are sometimes switched by manufacturers. This is where your circuit tester becomes indispensable. Confirm what each wire does on your specific harness.
- Beyond Color: While color coding is a helpful guide, a proper 6 pin wiring schematic will also show the pin location on the connector, which is the ultimate authority. Always refer to both if available.
The Trailer Side: Getting Your Rig Ready for the Road
Now that you're armed with knowledge and tools, let's tackle wiring your trailer's side of the connector. This section assumes you're either replacing an old harness or installing a brand-new one.
Step 1: Prep, Plan, and Procure
Before cutting any wires, take a moment to assess your trailer's current setup and gather any additional components:
- Junction Box: Do you have an existing one? If not, do you plan to install one? A junction box simplifies wiring by providing a central hub for all connections and makes future troubleshooting easier.
- Breakaway Kit: If your trailer has electric brakes, a breakaway kit is often legally required. This system applies the trailer brakes if the trailer detaches from the tow vehicle. It needs a connection to the 12V hot lead.
- Trailer Light Kit: If you're replacing all your trailer's lights, ensure your new light kit is compatible with a 6-way system. Most modern kits are.
- New 6-Way Harness: If you're just replacing the connector and the lead cable, ensure your new harness is long enough to reach from your connection point to your tow vehicle.
Step 2: Locating or Installing Your Junction Box
The junction box is a crucial point for organizing your trailer's wiring.
- Existing Junction Box: If your trailer already has one, it's typically located near the front of the trailer, often on the tongue or frame, protected from road debris. Simply remove its cover to access the terminals.
- Installing a New Junction Box:
- Choose a Spot: Select a suitable location on the trailer tongue or frame. It should be close enough to easily reach all existing trailer wiring, protected from physical damage, and not interfere with moving parts like the coupler or suspension.
- Mount Securely: Use self-tapping screws or bolts to firmly attach the junction box to the trailer frame. Ensure it's mounted in an orientation that allows water to drain, typically with the wires entering from the bottom or side.
- Route the Harness: Feed the new 6-way harness cable through one of the grommeted holes into the junction box.
What if I Don't Want a Junction Box?
While a junction box is highly recommended for organization and troubleshooting, you can tie your new 6-way harness directly into existing trailer wiring. This typically involves cutting the old connector off and using butt connectors to splice the new 6-way directly to the individual wires running to your trailer's lights and brakes. This method is less tidy and harder to work with later but is an option if space or budget is a concern.
Step 3: Making the Trailer Connections
This is where the magic happens. We'll outline both methods: with a junction box and without.
Method A: Connecting with a Junction Box (Recommended)
- Prepare the New Harness:
- Route the 6-way harness cable into the junction box.
- Cut the cable to a suitable length, leaving enough slack to work comfortably but not so much that it creates excessive clutter.
- Carefully strip back the outer jacket of the 6-way cable to expose the individual colored wires, typically 4-6 inches.
- Strip about 1/2 inch of insulation from the end of each individual colored wire.
- Crimp a properly sized ring terminal onto each stripped wire end. Ensure a snug, secure crimp.
- Connect to Junction Box Studs:
- Inside the junction box, you'll see several threaded studs, each typically labeled or colored to match standard functions.
- Remove the nuts from the studs.
- Match your new harness wires (with their ring terminals) to the corresponding studs. For example, the white ground wire from your new harness goes to the "Ground" stud.
- If replacing an old harness, remove its wires from the studs first.
- Place the new ring terminals onto the correct studs, ensuring good metal-to-metal contact.
- Reinstall the nuts, tightening them firmly but not overtightening, which could strip the threads.
- Remember: Always double-check your specific harness's instructions and your circuit tester for confirmation!
- Connect Existing Trailer Wires:
- Now, connect the wires running from your trailer's lights, brakes, and 12V system to the same corresponding studs in the junction box.
- For example, the brown wire coming from your trailer's tail lights connects to the "Tail/Running Lights" stud, where your new harness's brown wire is also connected.
- Ensure all connections are clean and tight.
- Secure and Seal:
- Once all connections are made, organize the wires inside the junction box with zip ties.
- Apply a small amount of dielectric grease to each stud connection for added corrosion protection.
- Replace the junction box cover, ensuring it's sealed properly to keep out moisture and debris.
- Secure any exposed wire runs leading from the junction box to the rest of the trailer with zip ties or wire clips, preventing them from hanging loose or chafing.
Method B: Connecting Without a Junction Box (Direct Splice)
If you're splicing directly, precision and weatherproofing are key.
- Identify Existing Wires:
- Locate the existing trailer wiring that runs to your lights, brakes, etc.
- Using your circuit tester, carefully identify the function of each existing trailer wire. This is crucial as their colors might not perfectly match the new harness.
- Example: Turn on your trailer's left turn signal and test each wire until you find the one that flashes. That's your left turn/brake wire.
- Cut and Strip:
- Cut the old connector off your trailer's main wiring harness.
- Cut your new 6-way harness lead to a suitable length.
- Strip about 1/2 inch of insulation from the end of each individual wire on both your new 6-way harness and the existing trailer wiring.
- Connect Wires:
- Match the new 6-way harness wires to the corresponding existing trailer wires by function, not just color.
- Use heat-shrink butt connectors for each connection. These provide a robust, weather-resistant seal when properly applied with a heat gun.
- Insert one wire end into one side of the butt connector and crimp securely.
- Insert the matching wire end into the other side and crimp securely.
- Apply heat from your heat gun evenly to the butt connector until it shrinks tightly around the wires and sealant oozes slightly from the ends, indicating a good seal.
- Repeat for all six wires.
- Secure and Protect:
- Bundle the newly connected wires neatly with electrical tape or zip ties.
- For maximum protection, consider placing the entire splice point inside wire loom or flexible conduit to shield it from road debris, water, and abrasion.
- Secure the entire run of the 6-way harness along the trailer tongue with zip ties or wire clips, ensuring it has enough slack for turns but won't drag on the ground.
The Vehicle Side: Powering Up Your Tow Vehicle
Now for the other half of the equation: your tow vehicle. The approach here depends on what kind of trailer wiring, if any, your vehicle already possesses.
Scenario 1: Your Vehicle Already Has a 6-Way Connector
Congratulations, this is the easiest scenario! Simply plug your newly wired trailer's 6-way connector into your vehicle's existing 6-way connector. You're ready for the post-installation test.
Scenario 2: Your Vehicle Has a 4-Way Connector
Many vehicles come factory-equipped with a 4-way flat connector. To upgrade to a 6-way, you'll typically use an adapter kit like the ETBC6 (Electric Trailer Brake Controller 6-Way) or similar. These kits usually plug into your existing 4-way and provide the additional connections.
- Plug in the Adapter: Plug the 4-way end of the adapter kit into your vehicle's existing 4-way connector.
- Identify Additional Wires: The adapter will typically have two additional wires emerging from it, usually blue and black (or red).
- Blue Wire: This is for the brake controller output. It needs to be connected to the output wire from your vehicle's electric brake controller. If you don't have a brake controller installed yet, you'll need to do that first. Run this blue wire from the adapter, along the frame, and up into the vehicle's cabin to connect to the brake controller's output.
- Black/Red Wire: This is your 12V hot lead. It needs to be connected directly to your vehicle's positive battery terminal. Run this wire securely along the vehicle frame, using zip ties and loom, and connect it to the positive battery post, ideally with an inline fuse holder (usually provided with adapter kits) installed close to the battery for safety.
- Make Connections: Use butt connectors (heat-shrink preferred) to make these connections secure and weatherproof. Ensure all wires are routed safely away from exhaust, suspension, and moving parts.
- Confirm Function: Before sealing everything up, use your circuit tester to confirm that the blue wire carries a signal when the brake controller is activated and that the black/red wire has constant 12V power.
Scenario 3: Your Vehicle Has No Connector (or needs a complete overhaul)
If your vehicle has no existing trailer wiring, you'll need to install a basic 4-way connector first, then use an adapter kit as described in Scenario 2.
- Install a 4-Way Connector:
- T-Connectors (Plug-in Style): These are the easiest. They plug directly into your vehicle's existing taillight wiring harness, usually behind the taillights, under the vehicle, or behind a rear cargo panel. No cutting or splicing required. You might need to remove taillights or interior trim panels to access these connectors. Follow the T-connector kit's specific instructions.
- Splice-in Style: If a T-connector isn't available for your vehicle, you'll need to splice directly into your vehicle's taillight wiring.
- Identify Vehicle Wires: This is the most critical step. Consult your vehicle's owner's manual or a wiring diagram, or use your circuit tester to identify the taillight, brake light, left turn, and right turn signal wires. Never guess.
- Connect: Splice the corresponding wires from your new 4-way harness into the vehicle's wiring using one of the methods below.
- Ground: Connect the 4-way harness's white ground wire to a clean, unpainted metal surface on the vehicle's frame.
- Add the 6-Way Adapter: Once your 4-way is installed and tested, proceed with adding the 6-way adapter as detailed in Scenario 2, connecting the blue brake output wire and the black/red 12V hot lead.
General Tips for Vehicle Connections
- Mounting Bracket: If your new connector is under the vehicle, use a mounting bracket to secure it to the hitch receiver or frame. This keeps it from dangling and protects it from damage.
- Corrosion Prevention: Always apply a small amount of dielectric grease to all electrical connections (inside the plug, on any butt connectors) to prevent corrosion, which is the bane of trailer wiring.
- Route Wires Safely: Use wire loom or conduit to protect wires running along the vehicle frame from heat, abrasion, and road debris. Secure them every 12-18 inches with zip ties or wire clips.
Wiring Methods: A Quick Breakdown
When splicing wires, you have a few options. Choose the one that best suits your skills and the desired reliability.
- Soldering (Most Reliable):
- How: Twist the stripped wire ends together, heat with a soldering iron, and apply solder until it flows into the connection.
- Pros: Provides the strongest, most reliable, and lowest-resistance electrical connection.
- Cons: Requires skill and a soldering iron.
- Protection: Always cover soldered connections with heat-shrink tubing to insulate and protect them from moisture and abrasion.
- Heat-Shrink Butt Connectors (Highly Recommended):
- How: Insert wires into opposite ends of the connector, crimp, then use a heat gun to shrink the connector and activate its internal sealant.
- Pros: Very reliable, easy for DIYers, provides excellent weather sealing.
- Cons: Requires a good crimping tool and a heat gun.
- Standard Butt Connectors (Acceptable, with added protection):
- How: Same as heat-shrink, but without the internal sealant.
- Pros: Simple, widely available.
- Cons: No inherent weather sealing.
- Protection: Must be wrapped with multiple layers of high-quality electrical tape or placed inside a junction box or wire loom to protect from moisture.
- Quick Splices / Scotchloks (Least Reliable):
- How: These plastic connectors clamp over two wires, using a metal blade to pierce the insulation and make contact.
- Pros: Quick and easy.
- Cons: Highly prone to corrosion, intermittent connections, and eventual failure because they don't provide a fully sealed connection and can damage wire strands.
- Recommendation: Avoid these for trailer wiring if possible. The exposed connection points lead to early failure.
The Golden Rule: Testing Your Connections (Before You Hit the Road)
You've put in the work, made the connections, and now it's time for the ultimate verification. Never skip this step! A thorough test ensures everything is working correctly and prevents frustrating surprises on the road.
- Connect Trailer to Vehicle: Plug the trailer's 6-way connector into the vehicle's 6-way receptacle.
- Engage Headlights/Running Lights: Turn on your vehicle's headlights. Walk around the trailer and confirm that all tail lights, side marker lights, and running lights illuminate. If not, check your brown wire connection.
- Test Brake Lights: Have a helper press the brake pedal (or use a prop). Verify that both trailer brake lights illuminate brightly. If not, check your yellow and green wire connections (they usually handle both turn and brake signals simultaneously).
- Test Turn Signals:
- Activate the left turn signal on your vehicle. Confirm the trailer's left turn signal flashes in sync.
- Deactivate, then activate the right turn signal. Confirm the trailer's right turn signal flashes.
- If a turn signal isn't working, recheck the corresponding yellow or green wire.
- Test Electric Brakes (if applicable):
- With the vehicle and trailer connected, manually activate your vehicle's electric brake controller. You should hear the trailer brakes engage a soft hum from the trailer axles, and possibly see an indication on your brake controller. If your trailer has a breakaway switch, briefly pull the pin to test it (ensure the switch is reset afterward).
- If the brakes don't engage, check the blue wire connection and ensure your brake controller is properly installed and powered.
- Test 12V Hot Lead (if applicable):
- With the vehicle running (to ensure alternator output), use your multimeter to check for 12V power at any accessory powered by the 12V hot lead on the trailer (e.g., interior lights, battery charger for breakaway battery).
- Alternatively, with the trailer unplugged, test for 12V at the 12V+ pin on the vehicle's connector using your multimeter.
- If no power, check your red/black wire connection, especially the fuse near the battery.
Making Adjustments:
If any function isn't working, go back to the relevant wire connection, disconnect, inspect, re-strip, re-crimp, and re-test. Often, it's a loose connection, a poorly crimped terminal, or a misidentified wire. Patience is key!
Troubleshooting Common Wiring Woes
Even with the best intentions, sometimes things don't go perfectly. Here are some common problems and how to approach them:
- No Lights (or only some) on Trailer:
- Check Ground: The most common culprit! Ensure the white ground wire is securely attached to a clean, unpainted metal part of both the trailer and vehicle frame. A poor ground affects all circuits.
- Corrosion: Inspect all connections, especially at the actual light fixtures, for rust or corrosion. Clean with a wire brush or sandpaper.
- Bulb Failure: Simple but often overlooked. Test the bulbs.
- Vehicle Fuses: Check the fuses in your tow vehicle that control trailer lighting.
- Wiring Damage: Look for pinched, chafed, or cut wires along the trailer tongue and frame.
- Flickering Lights:
- Loose Connections: Re-check all crimps and splices. A connection that's almost good can cause intermittent flickering.
- Poor Ground: Again, a weak ground can manifest as flickering lights, especially when multiple functions are active.
- Brake Lights Don't Work, but Turn Signals Do (or vice-versa):
- This is typically only an issue on older systems where turn and brake lights were separate. On most modern trailers, the yellow and green wires handle both functions. If one works but not the other, re-verify the input from your vehicle's wiring, as the issue might be on the vehicle side (e.g., a bad brake light switch or turn signal switch).
- Electric Brakes Not Working:
- Brake Controller Settings: Ensure your vehicle's brake controller is properly installed, powered, and adjusted.
- Blue Wire Connection: Check the entire run of the blue brake controller output wire for continuity and secure connections.
- Trailer Brake Magnets: On the trailer, check the connections to the brake magnets inside the drum.
- Breakaway Switch: Ensure the breakaway switch pin is fully inserted and the battery is charged.
- No 12V Power to Trailer:
- Red/Black Wire Connection: Verify the entire run of the 12V hot lead, from your vehicle's battery to the trailer connection.
- Inline Fuse: Check the inline fuse near your vehicle's battery. This fuse protects your vehicle's electrical system and can blow if there's a short.
- Vehicle Battery: Ensure your vehicle's battery is charged and healthy.
Remember, a multimeter or circuit tester is your best friend when troubleshooting. Systematically test each connection point to isolate where the power stops flowing.
Maintenance & Longevity: Keeping Your Connections Sound
A proper DIY installation isn't just about getting it done; it's about ensuring it lasts. A few simple maintenance practices can dramatically extend the life of your trailer wiring:
- Regular Visual Inspection: Before and after long trips, quickly inspect your trailer harness. Look for frayed wires, cracked insulation, or loose connections. Pay special attention to areas prone to rubbing or impact.
- Apply Dielectric Grease: Periodically (e.g., annually) unplug your 6-way connector and apply a fresh dab of dielectric grease to the pins. This acts as a barrier against moisture and corrosion.
- Keep Connectors Clean: Dirt, dust, and road salt can interfere with electrical contact. Use electrical contact cleaner or a small brush to keep the inside of your connectors clean.
- Secure Wiring: Ensure all wiring is securely fastened along the trailer frame. Re-tighten zip ties or clips as needed. Loose wires are prone to damage.
- Protect from Elements: If your trailer is stored outdoors, consider using a cover for the electrical connector when not in use. Some trailers even have a storage holster for the connector.
Confident Connections for the Open Road
You've now navigated the complexities of wiring a 6-pin trailer connector, from understanding wire functions and choosing the right tools to making secure connections on both your trailer and tow vehicle. This isn't just a technical skill; it's a foundational step toward safe and enjoyable towing adventures.
By taking the time to do it right, following safety precautions, and meticulously testing each connection, you've not only saved yourself money but gained invaluable knowledge and the confidence that comes with mastering a practical skill. So, hitch up, test your lights one last time, and hit the open road knowing your trailer is connected with competence and care. Safe travels!