Navigating the world of trailer wiring can feel like deciphering an ancient script, especially when your setup demands more than just basic lights. While a standard 6-pin connector reliably handles essential functions, many of us pushing the boundaries of what a utility or recreational trailer can do eventually find ourselves confronting the intricacies of Advanced 6-Pin Trailer Wiring Applications. This isn't just about connecting a few wires; it’s about strategic power distribution, thoughtful signal routing, and smart integration to bring more complex accessories to life on your trailer.
You’re not just looking for brake lights and turn signals; perhaps you need auxiliary power for a portable fridge, a dedicated circuit for charging an onboard battery, or even a signal to control a small hydraulic pump. These advanced scenarios transform the humble 6-pin plug from a simple connector into a crucial control hub. The goal here isn't to haphazardly add wires but to engineer a robust, reliable, and safe system that serves your specific, often custom, needs.
At a Glance: Key Takeaways for Advanced 6-Pin Wiring
- Beyond the Basics: A 6-pin connector can handle more than standard lights and electric brakes; it's capable of auxiliary power, switched functions, and even low-current control signals.
- Strategic Pin Allocation: With limited pins, careful planning is essential to assign functions, sometimes requiring repurposing a standard pin for a non-traditional role.
- Current Management is Crucial: Always calculate the total current draw for all accessories to ensure your wiring and tow vehicle circuits can handle the load safely.
- Relays and Diodes are Your Friends: For higher current draws or signal isolation, integrate relays and diodes to protect your vehicle and expand functionality without overloading the 6-pin direct circuit.
- Documentation is Paramount: Diagram your custom wiring clearly. This saves immense headaches during troubleshooting or future modifications.
- Safety First: Proper wire gauge, fusing, secure connections, and weatherproofing are non-negotiable for a reliable and safe advanced setup.
The 6-Pin Connector: A Foundation for Ingenuity
Before we dive into the deep end, let's briefly revisit the 6-pin connector itself. Unlike the simpler 4-pin (which only handles basic lighting) or the more comprehensive 7-pin RV connector (which adds a dedicated battery charge and reverse light pin), the 6-pin occupies a unique middle ground. It typically offers:
- Ground: The common return path for all circuits. Absolutely critical for everything to function.
- Left Turn/Brake: Powers the left turn signal and left brake light.
- Right Turn/Brake: Powers the right turn signal and right brake light.
- Tail/Running Lights: Powers all rear and side marker lights when headlights are on.
- 12V Auxiliary Power: A constant (or ignition-switched) 12V feed, often used for internal trailer lights, small charging, or basic accessories.
- Electric Brakes: The signal wire from a brake controller to activate trailer electric brakes.
You can get a visual understanding of this standard layout by checking out Our 6-pin trailer wiring schematic. Where advanced applications come into play is when you need to stretch these six connections to do more than their default assignments, or when you optimize how each pin delivers its intended function under heavier loads or specific conditions. It’s about leveraging the available capacity and cleverly integrating external components to achieve greater utility from your trailer.
When "Standard" Just Won't Cut It: Common Advanced Scenarios
The need for advanced 6-pin wiring usually stems from a desire to add functionality that goes beyond typical lighting and braking. Here are some of the most frequent scenarios where you'll find yourself pushing the limits of your 6-pin:
1. Enhanced Auxiliary Power Delivery
The standard 12V auxiliary pin is often a lifeline for minor loads, but what if you need more? This pin can be modified or amplified for:
- Onboard Battery Charging: Many trailers, especially utility or small cargo models, might have a small 12V battery for interior lights or a winch. You can use the 12V aux pin to trickle charge this battery from the tow vehicle while driving. This requires careful consideration of wire gauge (to minimize voltage drop over distance) and a charging isolator or simple diode to prevent the trailer battery from draining the tow vehicle's battery when parked.
- Heavy-Duty Work Lights: If your trailer doubles as a mobile workstation, you might want powerful LED floodlights. While the 6-pin might provide the signal to turn them on, you'll likely use a relay, triggered by the 6-pin, to draw the main power directly from a dedicated, heavier-gauge line.
- Small Appliances: Running a portable air compressor, a small inverter for AC tools, or even a mini-fridge requires a substantial and stable 12V supply. The factory-installed 12V auxiliary wire in most tow vehicles is often too small for these continuous, higher-current applications. This demands a dedicated, fused, heavier-gauge power wire run directly from the tow vehicle battery, passing through the 6-pin (or even a separate connector for the primary power) to a distribution block on the trailer.
2. Specialized Lighting Control
Beyond standard running and brake lights, trailers can benefit from additional illumination:
- Dedicated Reverse Lights: While 7-pin connectors have a dedicated reverse light pin, a 6-pin doesn't. You might repurpose the 12V auxiliary pin to activate reverse lights only when the vehicle is in reverse, requiring a relay in the tow vehicle triggered by the reverse signal, feeding power to that repurposed pin. This leaves the brake signal separate.
- Scene Lighting/Area Lights: Imagine setting up camp or working late at a job site. Independent switched lights on the trailer sides or rear can be invaluable. One of the existing "spare" or underutilized pins (e.g., the 12V aux if you have a separate charging solution, or if you only need switched power) can be used to carry a low-current trigger signal to a relay, activating these lights from the tow vehicle.
3. Low-Current Actuator/Solenoid Control
For highly specialized trailers, a 6-pin can even provide control signals:
- Hydraulic Pump Activation: On a small dump trailer or a trailer with a lift gate, the 6-pin could be used to send a low-current signal to activate a hydraulic pump's solenoid. This signal would not carry the heavy current for the pump motor itself, which would be powered by a dedicated, high-amperage circuit (often with its own robust connection, like an Anderson plug, due to the high draw). The 6-pin acts merely as the remote "on/off" switch signal.
- Winch Control (Limited): Similar to hydraulic pumps, a winch usually draws too much current for a 6-pin. However, the 6-pin could provide a signal to a winch's control box, effectively operating as a remote switch for "power in" or "power out" functions, again, relying on the winch's own heavy-duty power supply.
These scenarios illustrate that "advanced" often means using the 6-pin not just for direct power, but as a sophisticated signal carrier, working in conjunction with relays, dedicated power lines, and onboard trailer systems.
The Pinout Predicament: Maximizing Each Connection
The core challenge with advanced 6-pin applications is the limited number of pins. You have six wires, and essential functions already claim four (ground, left turn/brake, right turn/brake, tail/running). That leaves just two for electric brakes and auxiliary power. If you need more, you enter the realm of strategic pin allocation.
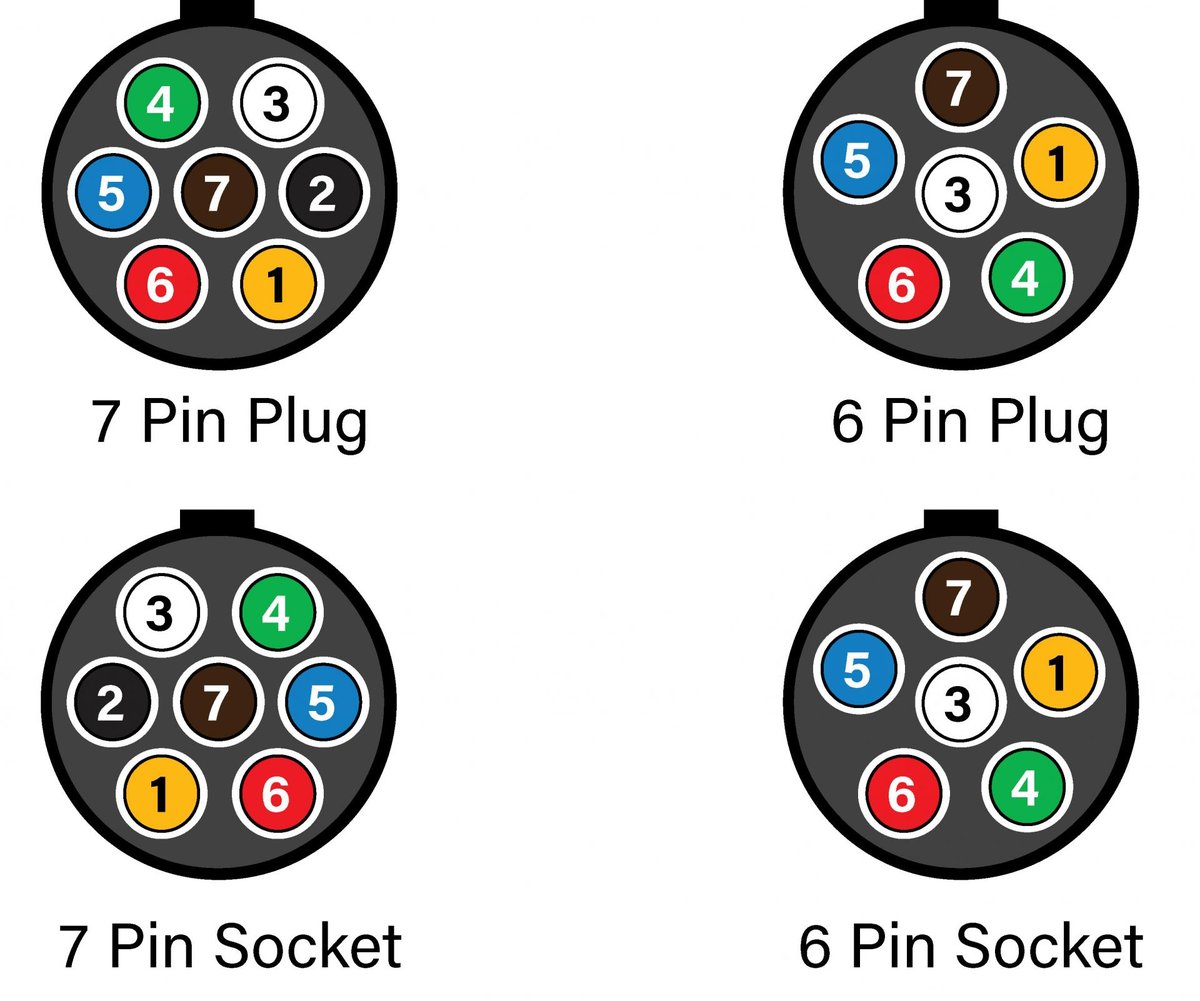
Standard Pinout Review (RVIA Color Code)
For reference, the most common 6-pin wiring color code (RVIA standard, though variations exist, always double-check!):
- White: Ground
- Brown: Tail, Marker, and Running Lights
- Yellow: Left Turn and Stop
- Green: Right Turn and Stop
- Blue: Electric Brakes
- Black: 12-Volt Auxiliary Power
When dealing with advanced applications, you might stick to these standards for the first four (lights) but then get creative with the Blue and Black wires, or even repurpose one of the lighting wires if your application allows for it (though this is generally discouraged for safety reasons unless absolutely unavoidable and clearly documented).
Repurposing Pins: When and How
Repurposing a pin means assigning it a function other than its standard one. This is typically done with the "12V Auxiliary Power" (Black) or "Electric Brakes" (Blue) pins, as altering lighting circuits is usually unsafe and illegal.
- Example: Using Black (12V Aux) for Reverse Lights: If your trailer doesn't need constant 12V auxiliary power (perhaps it has its own battery charged differently, or no 12V accessories), you could repurpose the Black wire. On the tow vehicle side, you'd connect it via a relay to your vehicle's reverse light circuit. On the trailer side, this wire would then power your reverse lights. Crucially, you lose your constant 12V aux function.
- Example: Using Blue (Electric Brakes) for a Switched Accessory (No Brakes): If your trailer does not have electric brakes, the Blue wire is essentially free. You could use it to provide a switched 12V signal (e.g., from an auxiliary switch in your vehicle cabin) to turn on trailer work lights or other accessories. However, if your trailer later gets electric brakes, you'd need to revert this.
Important Considerations for Repurposing: - Clear Documentation: If you repurpose a pin, you must document it clearly. Label the wires, create a custom diagram, and ideally, inform anyone else who might tow or work on the trailer. What's "advanced" to you is just "weird" to someone else without proper notes.
- Current Limitations: Remember the wire gauge. The factory wire for 12V aux might be 12-gauge or 14-gauge, suitable for moderate loads. If you repurpose it for something that draws more current, you might need to upgrade the wire inside the connector or ensure it only carries a low-current trigger signal for a relay.
- Tow Vehicle Side Modifications: Repurposing isn't just about the trailer; you'll need to modify the tow vehicle's wiring to send the correct signal or power to that pin as well. This often involves tapping into existing vehicle circuits (e.g., reverse lights, an auxiliary switch) and running new wires to the 6-pin connector.
Engineering Your Advanced 6-Pin System: A Step-by-Step Guide
Building an advanced 6-pin setup isn't a spontaneous job. It requires careful planning and execution.
Step 1: Define Your Needs – The Wishlist
Start with a comprehensive list of every function you want your trailer to perform that goes beyond standard lighting and braking. Be specific:
- "Charge trailer battery"
- "Power LED work lights (total 50W)"
- "Activate hydraulic pump for dump bed (signal only)"
- "Have reverse lights"
- "Run small fridge (12V, 3A continuous)"
Step 2: Calculate Current Draw – The Power Budget
For each item on your wishlist that draws power (excluding purely signal functions), estimate its current draw (Amps). The formula is: Amps = Watts / Volts. For 12V systems, Amps = Watts / 12.
- LED Work Lights (50W): 50W / 12V = 4.17A
- Small Fridge (3A)
- Battery Charging (estimate 5-10A for trickle charging, potentially more for smart chargers)
Sum up the maximum simultaneous current draw. This total helps determine wire gauge, fuse ratings, and whether a single pin can handle the load. Remember, continuous loads generate heat, so factor in a safety margin (e.g., design for 80% of max wire capacity).
Step 3: Pin Allocation Strategy – The Wiring Map
Now, decide which wire carries which function. This is where you might deviate from standard:
- Essentials First: Ground (White), Left Turn/Stop (Yellow), Right Turn/Stop (Green), Tail/Running (Brown) are usually non-negotiable.
- Evaluate Blue & Black:
- Does your trailer have electric brakes? If yes, Blue is dedicated.
- Do you need constant 12V auxiliary power? If yes, Black is dedicated.
- If either is not needed, it becomes a candidate for repurposing.
- Prioritize Repurposing: If you need more than two additional functions, you'll need to make tough choices. For example, if you need reverse lights and battery charging, but only have a 6-pin:
- Option A: Repurpose Black for reverse lights, then find another way to charge the battery (e.g., a dedicated second connector or solar).
- Option B: Keep Black for charging, and forgo reverse lights from the 6-pin.
- Option C: Use a signal from Black to trigger a relay on the trailer for reverse lights, which draws power from the trailer's own battery (charged via Black). This requires trailer battery.
This exercise often highlights the limitations of the 6-pin, sometimes leading to the conclusion that a 7-pin or even an additional dedicated connector (like an Anderson plug for heavy power) is ultimately a better fit for truly complex setups.
Step 4: Wire Selection and Routing – The Physical Connection
- Wire Gauge: This is critical. Use wire that can safely handle the calculated current draw over the length of the run. Consult a wire gauge chart (e.g., AWG chart) for 12V systems, factoring in voltage drop. Larger gauges (smaller AWG numbers like 10AWG, 8AWG) carry more current with less loss. For example, a 12AWG wire is typically good for 20A over a short distance, but might be insufficient for a continuous 15A load over 20 feet.
- Insulation: Ensure wires are automotive grade, resistant to oil, fuel, and abrasion.
- Connectors: Use high-quality, weather-sealed connectors. Heat-shrink butt connectors, soldered connections covered with marine-grade heat shrink, and dielectric grease are your best friends.
- Routing: Run wires safely, away from hot exhaust components, sharp edges, and moving parts. Use split loom tubing or conduit for protection. Secure wires with cable ties every 12-18 inches.
Step 5: Integration with the Tow Vehicle – The Source Connection
This is often the most challenging part.
- Dedicated Power Circuits: For higher current draws (e.g., battery charging, continuous heavy auxiliary power), do not simply tap into existing vehicle circuits. Run a dedicated, fused wire directly from your tow vehicle's battery to the 6-pin connector. Use an appropriate inline fuse or circuit breaker close to the battery.
- Relays: When tapping into existing low-current signals (like reverse lights or an auxiliary switch in the cabin) to activate a higher-current function on the trailer, use a relay on the tow vehicle side. The low-current signal activates the relay, which then switches power from a dedicated fused source to the 6-pin. This protects the vehicle's original wiring.
- Brake Controller: If using electric brakes, ensure your brake controller is properly installed and calibrated. The blue wire from the controller goes to the blue pin on the 6-pin connector.
Mini Case Snippet: The Expedition Gear Trailer
Imagine you have a small expedition trailer. You want:
- Standard lights & brakes.
- To charge an onboard battery (for a fridge, internal lights) while driving.
- Switched LED exterior scene lights for camp setup.
- A small 12V water pump (intermittent use).
6-Pin Allocation Strategy:
- White, Yellow, Green, Brown: Standard lights (4 pins).
- Blue: Electric Brakes (1 pin).
- Black (12V Aux): This is the crucial pin.
- Instead of just charging the battery, this pin will carry a heavy-gauge (e.g., 10 AWG) direct power line from the tow vehicle's battery (fused 30A). This robust line goes to a battery isolator/DC-DC charger on the trailer, ensuring the trailer battery charges efficiently and doesn't drain the tow vehicle.
- For the scene lights and water pump, the signal to activate them will come from auxiliary switches in the tow vehicle cabin, running on separate, low-current wires. These signals won't go through the 6-pin. Instead, the scene lights and water pump will be powered by the trailer's onboard battery, controlled by relays that are themselves activated by switches on the trailer or through a wireless remote. The 6-pin's role here is to keep that trailer battery topped up.
This example highlights that often, advanced solutions use the 6-pin for critical core functions (lights, brakes, primary charging) while higher-draw or specialized accessories draw power from an onboard trailer battery, which is maintained by the 6-pin.
Beyond the Basics: Relays, Diodes, and Smart Solutions
When your needs truly outstrip the direct capacity of a 6-pin, you start looking at smart electronics.
The Power of Relays
Relays are electromagnetic switches. A small current (the "control" signal) can activate a coil, which then closes a much larger circuit, allowing a heavy current to flow.
- Use Case: You want to turn on powerful LED work lights on your trailer using a simple dashboard switch. Running the full current (e.g., 15A) for those lights all the way from the dashboard, through your tow vehicle's wiring, through the 6-pin, and back to the lights is inefficient and potentially dangerous (requiring very heavy gauge wires everywhere).
- Relay Solution: You run a low-current control wire (e.g., 18AWG) from your dashboard switch to a relay on the trailer side (or tow vehicle side, near the power source). This relay's main power contacts are then connected to a heavy-gauge, fused wire directly from the trailer battery (or a dedicated power line from the tow vehicle via the 6-pin's heavy aux wire). The relay then switches the heavy current directly to the lights. This protects your tow vehicle's circuits and allows for higher power delivery.
Diodes for Isolation
A diode acts like a one-way valve for electricity. It allows current to flow in one direction but blocks it in the other.
- Use Case: Preventing "backfeed." Imagine you've repurposed the Black (12V Aux) wire for reverse lights. If your trailer has its own battery and you also have auxiliary lights wired to that Black wire, you could potentially send power back to your tow vehicle's reverse light circuit when the trailer's aux lights are on, possibly damaging components.
- Diode Solution: Installing a diode in the circuit, allowing power only to flow from the tow vehicle to the trailer's reverse lights (or vice-versa, depending on design), prevents unintended power paths. Diodes are also crucial in battery isolator circuits to ensure the tow vehicle battery isn't drained by trailer accessories.
Considering a 7-Pin Upgrade
While this article focuses on the 6-pin, it's worth a moment to consider if your "advanced" needs might simply be better served by a 7-pin RV connector. The 7-pin adds a dedicated reverse light pin and often a heavier-gauge 12V auxiliary/battery charge pin. If you're struggling to cram all your desired functions into a 6-pin and foresee further expansion, upgrading might save you headaches in the long run. It's often easier to adapt a 7-pin to do less than to force a 6-pin to do too much.
Installation Best Practices for Reliability and Safety
No matter how clever your wiring design, poor installation will lead to failures.
- Weatherproofing is Non-Negotiable: Trailer wiring lives a harsh life.
- Connections: Use marine-grade heat shrink tubing over all crimped or soldered connections. This creates a waterproof seal.
- Dielectric Grease: Apply dielectric grease to all electrical contacts within connectors (e.g., the 6-pin plug itself) to prevent corrosion and improve conductivity.
- Wire Protection: Use split loom or conduit to protect wires from abrasion, UV, and road debris.
- Proper Crimping and Soldering:
- Crimping: Use a high-quality crimping tool and appropriate crimp terminals for the wire gauge. A good crimp should be mechanically strong and electrically sound. Tug on connections to verify they're secure.
- Soldering: When soldering, ensure clean, strong joints. Overheat is bad. After soldering, always insulate with heat shrink.
- Fusing and Circuit Protection: Every new circuit you add, especially one drawing directly from the battery, must have an appropriately sized inline fuse or circuit breaker located as close to the power source (battery) as possible. This protects the wire itself from overheating and causing a fire in case of a short circuit. Don't forget to fuse both the tow vehicle side and, if applicable, the trailer side for any circuits running from an onboard trailer battery.
- Cable Management: Keep wires neat and tidy. Secure them with cable ties or clips every 12-18 inches along their run. Avoid letting wires dangle or rub against chassis components. Leave enough slack for turns and suspension movement, but not so much that they snag.
- Robust Grounding: A poor ground connection is the number one cause of trailer wiring headaches. Ensure your main ground wire (White) is securely attached to a clean, bare metal part of the trailer frame. Use a self-tapping screw or bolt with a star washer for good contact. On the tow vehicle side, ensure the ground connection is equally robust. All auxiliary grounds on the trailer should ultimately trace back to this main frame ground.
- Thorough Testing: After installation, test everything exhaustively.
- Use a multimeter to check for continuity, voltage, and ground resistance.
- Test each light function, brakes, and all auxiliary circuits with the tow vehicle connected.
- Wiggle wires and connections to check for intermittent issues.
Common Advanced Wiring Pitfalls and How to Avoid Them
Even with careful planning, mistakes happen. Knowing the common traps can help you steer clear.
- Overloading a Single Pin/Wire: Trying to run too many high-current accessories through a single 6-pin wire will lead to excessive heat, voltage drop, blown fuses, or even fire. Always use relays for high-current loads, triggered by the 6-pin.
- Inadequate Grounding: As mentioned, a weak ground connection causes mysterious dimming lights, erratic brake performance, and non-functional accessories. Always verify your ground path with a multimeter.
- Neglecting Voltage Drop: Longer wire runs, especially with smaller gauges, will lead to voltage drop. This means the 12V from your battery might only be 10V by the time it reaches your accessory, causing it to operate poorly or not at all. Use thicker wire for longer runs or higher currents.
- Poorly Sized Fuses: An undersized fuse will constantly blow. An oversized fuse won't protect the wire or accessory from damage. Match the fuse rating to the wire gauge and the maximum expected current draw of the circuit.
- Lack of Documentation: You might remember your custom pinout today, but will you in two years? Or will the next owner? A clearly drawn diagram showing what each wire does is invaluable for future troubleshooting or modifications.
- Forgetting to Isolate Battery Systems: If your trailer has its own battery that is charged by the tow vehicle, use a battery isolator or a DC-DC charger. Without it, the trailer accessories could drain your tow vehicle's battery, leaving you stranded.
Troubleshooting Advanced 6-Pin Setups
When something goes wrong, a methodical approach is key.
- Start Simple: Don't assume the most complex part of your advanced wiring is the culprit. First, check all standard lighting functions. Are they working? This helps isolate the problem to your advanced circuits.
- Verify Power Source: Is power reaching the 6-pin connector on the tow vehicle side? Use a test light or multimeter to check voltage at each active pin.
- Check Ground: Test the ground continuity on both the tow vehicle and trailer side. A good ground connection should read very low resistance (close to 0 ohms) to the frame.
- Inspect Fuses and Circuit Breakers: A blown fuse is a clear indicator of an overload or short. Replace it, but be prepared for it to blow again if the underlying issue isn't resolved.
- Examine Connections: Visually inspect all crimps, soldered joints, and the plug itself for corrosion, looseness, or damage. Wiggle connections while testing to see if the problem is intermittent.
- Test Components Individually: If an accessory isn't working, bypass the trailer wiring and connect it directly to a known good 12V source (like a car battery) to confirm the accessory itself is functional.
- Trace the Circuit: Follow the problematic wire from source to destination, checking voltage and continuity at various points. Look for breaks, shorts, or points of high resistance.
- Consult Your Diagram: This is where your custom wiring diagram becomes your most valuable troubleshooting tool.
Future-Proofing Your Advanced Trailer Wiring
Even with a complex setup, thinking ahead can save future effort.
- Build with Expandability in Mind: If you only need two auxiliary functions now but anticipate adding more later, consider leaving a bit more slack in your wiring loom, or even running a larger-gauge main power wire than strictly necessary, so it can handle future loads.
- Label Everything: Use permanent labels on wires, relays, and fuse blocks. This makes future identification and troubleshooting significantly easier.
- Regular Inspections: Periodically inspect your trailer wiring, especially before long trips. Look for frayed wires, cracked insulation, corroded terminals, and loose connections. Catching issues early prevents roadside failures.
Empowering Your Next Trailer Project
Tackling advanced 6-pin trailer wiring applications is a rewarding endeavor that significantly expands your trailer's capabilities. It demands a blend of careful planning, electrical knowledge, and meticulous execution. By understanding the limitations and possibilities of each pin, strategically allocating functions, managing current loads, and adhering to best practices for installation, you can build a reliable and highly functional system.
Remember, the goal isn't just to make things work, but to make them work safely and consistently. With a solid plan and attention to detail, you’ll transform your trailer from basic hauler to a versatile companion, ready for whatever advanced tasks you throw its way.